Starting seeds indoors gives you a head start on the growing season and opens up a world of plant varieties not available at local nurseries. With the right setup and timing, you can grow hundreds of seedlings for a fraction of the cost of buying transplants.
Benefits of Starting Seeds Indoors

- Earlier harvests – Transplant established seedlings when weather warms
- Greater variety – Grow unique heirloom and specialty varieties
- Cost savings – A packet of seeds costs less than a single transplant
- Healthier plants – Know exactly how your plants were grown
- Gardening therapy – Tend plants during the long winter months
Essential Seed Starting Supplies

Containers
Options include cell trays, peat pots,
Growing Medium
Use sterile seed starting mix, not garden
Light
Most seedlings need 14-16 hours of light daily. South-facing windows rarely provide enough light – invest in grow lights for stocky, healthy seedlings.
Heat
Many seeds germinate best at 70-85°F
When to Start Seeds
Count backwards from your last frost date. Seed packets usually indicate how many weeks before transplanting to start seeds indoors.
Common Timing Guidelines
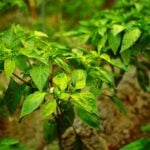
- 10-12 weeks before last frost: Onions, leeks, peppers
- 6-8 weeks before: Tomatoes, eggplant, broccoli, cabbage
- 4-6 weeks before: Lettuce, basil, cucumbers
- 2-4 weeks before: Squash, melons, beans (or direct sow)
Seed Starting Steps
1. Moisten Your Mix
Pre-moisten seed starting mix before filling containers. It should be damp like a wrung-out sponge, not soggy.
2. Fill Containers
Fill cells or pots with mix, lightly firming but not compacting. Leave a small gap at the top for watering.
3. Plant Seeds
Follow packet instructions for planting depth. General rule: plant seeds 2-3 times as deep as they are wide. Tiny seeds may just need pressing into the surface.
4. Cover and Warm
Cover containers with plastic domes or wrap to retain moisture until germination. Place on heat mats if available.
5. Provide Light
As soon as seedlings emerge, remove covers and provide strong light. Keep lights 2-4 inches above seedlings.
6. Water Carefully
Bottom watering prevents damping off and encourages deep root growth. Avoid letting seedlings dry out completely.
Hardening Off
Before transplanting outdoors, seedlings need to adjust to outdoor conditions. Gradually expose them to outdoor sun, wind, and temperatures over 7-10 days.
🌱 Seed Starting Supplies
- Seed Starting Trays – View on Amazon
- Seedling Heat Mat – View on Amazon
- LED Grow Lights – View on Amazon
As an Amazon Associate, we earn from qualifying purchases.
Conclusion
Starting seeds indoors is one of the most rewarding skills a gardener can develop. Begin with easy crops like tomatoes and lettuce, then expand to more challenging varieties as you gain experience.
🌱 Seed Starting Essentials