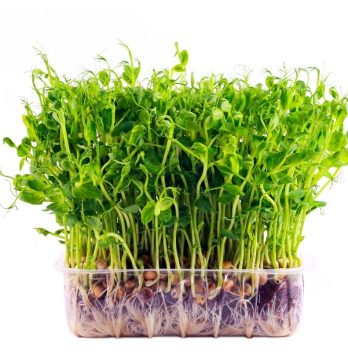
Over these last few years, microgreens have seriously gained some popularity. It’s no news that anything greens are great, and when they come in tiny bits, it’s even better. Micro-greens can be a great addition to your meals and they will enhance the flavor and look of your dishes. Now, wouldn’t it be a great idea for you to grow micro-greens hydroponically? Of course!
Growing micro-greens hydroponically is pretty easy just like growing other leafy greens. Micro-greens are the seedlings stage of various herbs and vegetables. When you plant the seeds of micro-greens such as basil, arugula, cilantro, etc, the first two or three leaves that sprout as they establish roots are known as the micro-greens.
Hydroponic Microgreens
A hydroponic micro-green simply entails cultivating your little veggies or herbs in a nutrient-filled solution without the mess of
Micro-greens are easy and fun to grow and growing them hydroponically is even better. You get to enjoy a greater yield of micro-greens at your disposal with hydroponics. They are perfect for home gardening because they only grow a few inches so they don’t take much space.

Benefits of Growing Microgreens Hydroponically
Here are the benefits of growing micro-greens hydroponically:
- Grown them anywhere: the micro-greens hydroponic set up can be grown anywhere. You can place them in your kitchen, living room, garage, basement, etc, and they will do well.
- Smaller water quantity consumption: the water in the hydroponic system can be reused. This implies they only need about 20 times less water compared to growing
soil . - Some micro-greens thrive well hydroponically: a couple of micro-greens do well in hydroponics. Examples of such micro-greens include kohlrabi, radish, wheatgrass, and kale. They will generate a greater yield rather than when grown in the
soil . - No
soil or compost mess: this is because it is a water-based system. You don’t have to worry aboutsoil mess even when placed inside your home. Therefore, they are ideal for home gardening. - Adequate control: you enjoy total control over your plants’ growth. You can control how much more or fewer nutrients your micro-greens will need to thrive.
Growing Microgreens Hydroponically at Home
You can either go for DIY hydroponics or purchase a complete hydroponic kit for your microgreens.
Here is what you will need when growing micro-green hydroponically in the comfort of your home:
- Micro-green seeds (use organic seeds for micro-greens and avoid fungicide treated seeds).
- Growing trays (10” x 20” plastic trays with drainage holes).
- Growing medium (e.g. coconut coir).
- Lights.
- pH test kit.
- Nutrients.
- Spray bottle.
Find A List Of Quality But Cheapest LED Grow Lights Online
Roleadro Grow Light, 1000W LED Grow Light
Getting Started
- Prepare the Balanced pH Water
To begin, one of the most important steps is to prepare your pH balanced water. The range should be around 5.5 to 6.5. You can add lime or wood ash to elevate the pH range and phosphoric acid to reduce the pH range. Use distilled water and apply the nutrients accordingly.
- Prepare the Growing Medium and Add Seeds
Next prepare your growing tray with coconut coir and sow your seeds evenly on the grow tray. Spray the seeds using the bottle sprayer with clean water or nutrient solution.
- Cover the Seeds and Mist
Cover your seeds with a lightproof cover afterward. Keep them in this dark warm position for 4 to 5 days. During this period, you can open your tray every 10 to 12 hours to mist the seed tray.
- Proper Light
You can uncover them after 5 days and you should begin to see some little sprout. Now is the time to feed them with proper light. We recommend using LED grow lights but you can also make use of fluorescent, direct sunlight, or incandescent light.
- Checks
From the beginning till harvest time, your water should have the right pH balance. Therefore, always monitor daily the correct balanced water.
- Water
You can now begin to water the tray directly with some little amount of water rather than misting it.
- Harvest
10 to 14 days later, most of the micro-greens are ready to be harvested. Some varieties can be harvested as early as 7 days.
We recommend you harvest them late nights or early morning when they are not hot. This way, you get tender and fresh micro-greens ready for use. If you are yet to use them, put them in a damp paper towel and keep them in your refrigerator till they are ready for use.
FAQ’s
How long does it take to grow microgreens hydroponically?
You can begin harvesting microgreens in 7-10 days from seed. Some growers like to harvest earlier and others wait until they are ready for the market.
What is the best soil mix for growing microgreens hydroponically?
The best soil mix for growing microgreens hydroponically is a combination of vermiculite, peat moss, and sand. We recommend using a high-quality seed starting medium.
Is the medium’s quality important?
We recommend starting your seeds on a high-quality seed starting medium. This will help them germinate and grow faster.
What’s the best way to harvest them?
The easiest way to harvest microgreens is to cut them off of the stems with scissors. To harvest them, you can either harvest individual leaves or all of the leaves at once. Harvesting leaves individually allows you to get a closer look at each leaf. Harvesting all of the leaves at once is quicker, but it can be a little bit tedious.
Additional Note
If you would like to grow micro-greens commercially or on a larger scale, you will have to take advantage of the vertical set up. This means you will opt for a vertical hydroponic system that is efficient in terms of more space and greater production.


